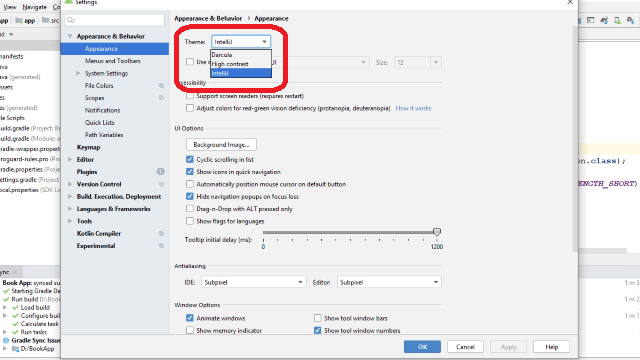
Android studio is a great IDE for developing android apps. An average developer spends lots of time on this IDE. It comes in a default light theme which is called the IntelliJ theme. For most of the developers light color IDE is very annoying and not eye-friendly. Because it is common for most of the developer to work in a dark room. I this article, we are going to show you how you can change the theme of your android studio very easily.
Theme change can be done using two different methods. You can switch the default theme with the official preinstalled theme. You can also do this using a third-party plugin. Here we are going to cover both of them.
How to switch between Android Studio’s official themes
After installing android studio for the first time, you will see the default theme. Which is white and the code is not easy to read. To enable the official dark theme on your android studio, follow the steps below:
Step 1: Go to ‘File’ and from the drop-down menu click on ‘Settings’
Step 2: Expand ‘Appearance & Behavior’ menu and click on ‘Appearance’
Step 3: Expand ‘Theme’ section and select ‘Darcula’
Step 4: Click on ‘Apply’ or ‘Ok’
In this way, you can switch between any of those 3-official themes. Here IntelliJ is the light theme and Dracula is the dark theme. High contrast theme can be a great option for you if you like high contrast text color. Want to make an android e-book app using PDF then read the article.
How to use a third-party theme in Android studio
There are many plugins you can use to make your work easy. You can change the full IDE theme using those plugins. The most popular third-party theme is ‘Material Theme UI’. This plugin contains many color options which are best for your eye. You can easily customize your code color, window element icons, file icons, and many more. This plugin is known as the ultimate theme customizer for android studio.
To change the theme of the android studio using third party plugin follow the steps below:
Step 1: Go to ‘File’ and click on ‘Plugins’
Step 2: Search ‘Material Theme UI’ and install it
Step 3: Restart Android studio to activate the plugin
Step 4: Go to Tools > Material Theme > Material Theme Chooser > Chose any theme from the menu
This process is so easy that any beginner can do this. You can change any color you want to change. You need to go to the Tools and then select ‘Material Theme’ then go to ‘Accent Colors’. Select any color you want to set. You can also change the panel options using this method. Here is a video for better understanding.
Android Studio official themes vs third-party themes
Third-party plugins are not good for low configuration computers. It can slow down the IDE performance. Themes are no exception. More plugins need more RAM use. IDE uses extra RAM and CPU when the theme is activated. If you are using a low configuration computer for app development then don’t use third-party plugins for only changing the look.
On the other hand, those 3 official themes are pre-coded in Android studio. It doesn’t need any external power for running. If your computer configuration is low then use them to reduce extra RAM and CPU use. Though, some of the plugins have a lite version. You can install them on your android studio. AVD not running on your computer? Read the article to solve this Best external emulator for android studio
Conclusion
Themes are just for good looking and better understanding. It doesn’t make you a super genius or pro developer. Use them when you need some extra functionality. Like a dark theme for saving your eye in the dark work area. Accessibility improvement like themes for color blind people. Change it when you actually need it.


