BOOK APP ANDROID STUDIO (Java)
To make an android book app first you need to select your content format. You can make your content in those following ways:- Text view
- HTML
- Image view etc.
But in this article, I am going to show you how you can make an android book app using PDF content! What you have to do is edit your document in MS Word or any word document editor you love and then you have to save it as a PDF file. Here I am going to give you all the code and documentation so that you can make it very easily.
At first, you have to create a new project and in the main activity, you need some buttons. You can also use a grid view or list view. But in this blog, I am going to use buttons. In the main activity java, you have to enable on click listener on those buttons. And you also need more activity to show the content. if you want to create an activity then you have to do this:
Right-click on values(android) > new > activity > Empty activity > give a name to the activity(example: Introduction)
Here the sample code:
activity_main.xml
<?xml version="1.0" encoding="utf-8"?>
<LinearLayout xmlns:android="http://schemas.android.com/apk/res/android"
xmlns:app="http://schemas.android.com/apk/res-auto"
xmlns:tools="http://schemas.android.com/tools"
android:layout_width="match_parent"
android:layout_height="match_parent"
android:orientation="vertical"
tools:context=".MainActivity">
<Button
android:id="@+id/itroductionID"
android:layout_width="match_parent"
android:layout_height="wrap_content"
android:background="#039BE5"
android:layout_marginTop="20dp"
android:layout_marginLeft="20dp"
android:layout_marginRight="20dp"
android:padding="20dp"
android:text="Introduction"
android:textAllCaps="false" />
<Button
android:layout_width="match_parent"
android:layout_height="wrap_content"
android:background="#C0CA33"
android:layout_marginTop="20dp"
android:layout_marginLeft="20dp"
android:layout_marginRight="20dp"
android:padding="20dp"
android:text="C"
android:textAllCaps="false" />
</LinearLayout>
MainActivity.Java
package com.bookapp;
import androidx.appcompat.app.AppCompatActivity;
import android.content.Intent;
import android.os.Bundle;
import android.view.View;
import android.widget.Button;
import android.widget.Toast;
public class MainActivity extends AppCompatActivity {
private Button introbutton,cbutton,csurpbutton;
@Override
protected void onCreate(Bundle savedInstanceState) {
super.onCreate(savedInstanceState);
setContentView(R.layout.activity_main);
introbutton=findViewById(R.id.itroductionID);
introbutton.setOnClickListener(new View.OnClickListener() {
@Override
public void onClick(View v) {
Intent intent=new Intent(MainActivity.this,Introduction.class);
startActivity(intent);
Toast.makeText(MainActivity.this,"Introduction",Toast.LENGTH_SHORT).show();
}
});}}
Now you have to create a menu for Introduction Activity. So, to do that you have to follow the flowing steps:
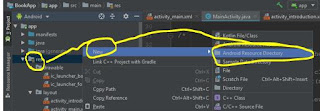
1. Click on res then right-click on it>New>Android resource directory Make the type of the resource “menu” And then click “ok”
Now you can find a new folder name “menu” right-click on it >New>Menu resource file> give a name to the file (example: Introduction_menu)>ok
Introduction_menu:
<menu xmlns:android="http://schemas.android.com/apk/res/android"
xmlns:app="http://schemas.android.com/apk/res-auto">
<item
android:id="@+id/go_to_main_activity"
android:title="go to main activity"
app:showAsAction="always"
android:icon="@drawable/home_main_activity" />
<item android:title="ALL SITES"
android:icon="@drawable/more_icon"
app:showAsAction="always">
<menu>
<item
android:id="@+id/introduction_chapter1"
android:title="Chapter1"
app:showAsAction="never"
android:icon="@drawable/arrow"
android:contentDescription="hello this is a content description">
</item>
<item
android:id="@+id/introduction_chapter2"
android:title="Chapter2"
app:showAsAction="never"
android:icon="@drawable/arrow">
</item></menu></item>
</menu>
To store PDF files, we have to create an asset folder. How we can create that? Ok here we go:
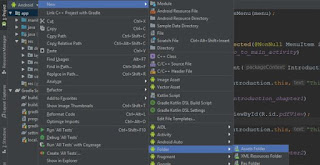
Step1: right-click on app>new>folder>asset folder>keep it main (no change)>finish
Step2: right-click on the asset folder which you just create in step1>paste the pdf file>rename the file as your wish.
Here I paste 2 PDF file which is “chapter1” and “chapter2”
Step3: Go to the following link: https://github.com/barteksc/AndroidPdfViewerV2 and from the library copy the dependency. When I am writing the article the dependency is
" compile 'com.github.barteksc:android-pdf-viewer:2.8.2' "
Now go to android studio build.gradle (Module.app) and paste the dependency like that:
Then click on “Sync Now” and wait some time (internet connection need) After successfully sync you have all the libraries you need!
Now go to the Github page again and copy this:
<com.github.barteksc.pdfviewer.PDFView
android:id="@+id/pdfView"
android:layout_width="match_parent"
android:layout_height="match_parent"/>
Now come to the Introduction Activity and in the xml just paste this code:
activity_introduction.xml
<?xml version="1.0" encoding="utf-8"?>
<RelativeLayout xmlns:android="http://schemas.android.com/apk/res/android"
xmlns:app="http://schemas.android.com/apk/res-auto"
xmlns:tools="http://schemas.android.com/tools"
android:layout_width="match_parent"
android:layout_height="match_parent"
tools:context=".Introduction">
<com.github.barteksc.pdfviewer.PDFView
android:id="@+id/pdfView"
android:layout_width="match_parent"
android:layout_height="match_parent"/>
</RelativeLayout>
And then go to the java or Interoduction.java and paste this code:
Interoduction.java
package com.bookapp;
import androidx.annotation.NonNull;
import androidx.appcompat.app.AppCompatActivity;
import android.content.Intent;
import android.os.Bundle;
import android.view.Menu;
import android.view.MenuInflater;
import android.view.MenuItem;
import android.widget.Toast;
import com.github.barteksc.pdfviewer.PDFView;
public class Introduction extends AppCompatActivity {
PDFView chapter1,chapter2;
@Override
protected void onCreate(Bundle savedInstanceState) {
super.onCreate(savedInstanceState);
setContentView(R.layout.activity_introduction);
//this is for default pdf. The first one you want to show!
chapter1=(PDFView)findViewById(R.id.pdfView);
chapter1.fromAsset("chapter1.pdf").load();
}
@Override
public boolean onCreateOptionsMenu(Menu menu) {
MenuInflater menuInflater= getMenuInflater();
menuInflater.inflate(R.menu.introduction_menu,menu);
return super.onCreateOptionsMenu(menu);}
@Override
public boolean onOptionsItemSelected(@NonNull MenuItem item) {
if(item.getItemId()==R.id.go_to_main_activity){
Intent intent= new Intent(Introduction.this,MainActivity.class);
startActivity(intent);
Toast.makeText(Introduction.this,"This is Chapter1",Toast.LENGTH_SHORT).show(); }
if(item.getItemId()==R.id.introduction_chapter1){
chapter1=(PDFView)findViewById(R.id.pdfView);
chapter1.fromAsset("chapter1.pdf").load();
Toast.makeText(Introduction.this,"This is Chapter1",Toast.LENGTH_SHORT).show();}
if(item.getItemId()==R.id.introduction_chapter2){
chapter2=(PDFView)findViewById(R.id.pdfView);
chapter2.fromAsset("chapter2.pdf").load();
Toast.makeText(Introduction.this,"This is Chapter2",Toast.LENGTH_SHORT).show(); }
return super.onOptionsItemSelected(item)}}
Explanation: When you select an item from the menu, the "if" statement will call the pdf file from the asset section. Then in Pdf View, it will show that particular pdf file.
Now run the app. Here I am sharing my results:
This one just a demo project. Now you can make any book app that you want.
Please consider the email subscription for every update. Follow our blog. Stay cool, stay creative.


Then you can load that from a remote server. You can use firebase to do that!
ReplyDeleteHello sir, I created a PDF book app on android studio but anytime I close the app and opens it again, the PDF starts from the beginning and not continuing from where I stopped, please how do I fix that,my PDF files are located in the asset folder, thanks
ReplyDelete