Which one is the best external emulator for the Android studio?
The android emulator simulates android devices on our computer and it provides almost every capability of a real android device. In the android studio, you can create your own virtual devices and you can run the app on those virtual devices or emulators.
But here is a problem, if you don’t have an intel processor or your system does not support AVD (Android virtual device) then you have to use an external emulator for an android studio. For example, I use the AMD Athlon 200Ge processor which doesn’t support by the android studio’s AVD. That’s why I need an Android emulator for android studio. I test a bunch of android emulators in windows 10 such as Droid4x, Bluestacks, GameLoop, LDPlayer, etc. and finally I found a free emulator which is the best for android studio. And the emulator is Nox player. Nox player is also available for Mac OS so this is a plus point for us.
Step 3: Select a folder to save the file
Step 3: Note down the android SDK location
Step 5: Select “adb”, “adbWinApi.dll”, “adbWinUsbApi.dll” files and copy them [ Trick: first click on “adb” and press and hold shift key and then click on “adbWinUsbApi.dll”. Now your 3 files are selected]
Step 7: Close file explorer, restart Android studio
Why I prefer Nox player?
- Lightweight, fast and free
- Android 5
- Easy to use
- Easily run on AMD processor
- The good refresh rate for games
- Available for both windows and mac
- You can easily customize the key for playing games
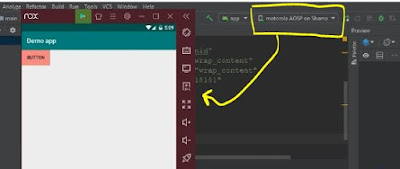
- Android studio can easily detect it
- It runs apps from the Android studio directly
- It provides almost every capability of a real android device
- Offline emulator for android studio
How to download and install the Nox player?
Step 1: Go to https://www.bignox.com/
Step 2: Click on download
Step 3: Select a folder to save the file
Step 4: After finishing the download click on the .exe file and install the emulator software.
How to connect Nox player with android studio IDE?
Most of the time Nox player connects with Android studio automatically. What I face in the past 2 years is 95%-time Nox player connects with Android studio automatically. To connect Nox player with android studio automatically all the time you have to follow the following steps:
Step 1: Go to android studio
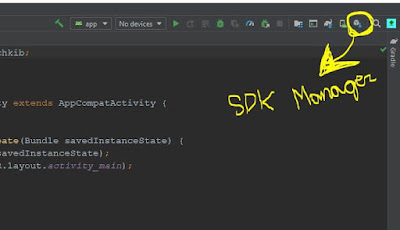
Step 2: Click on SDK manager
Step 3: Note down the android SDK location
Step 4: Go to the Android SDK location in file explorer then click on “platform-tools”
Step 5: Select “adb”, “adbWinApi.dll”, “adbWinUsbApi.dll” files and copy them [ Trick: first click on “adb” and press and hold shift key and then click on “adbWinUsbApi.dll”. Now your 3 files are selected]
Step 6: Go to the drive where you installed Nox player then go to “program files”> Nox> bin and paste those 3 files there.
Step 7: Close file explorer, restart Android studio
Step 8: Open Nox player
Yeah within 30 seconds your Nox player will be connected with Android studio.
But, if you face any problem let us know, Just comment below. Follow our blog. Get the email subscription for every new post.
Learn more about android development.


Your article has piqued a lot of positive interest. I can see why since you have done such a good job of making it interesting. lesen
ReplyDeleteNice post
ReplyDeleteThanks a lot for your opinion about this post. Stay connected with us.
Delete