The app icon is probably the most underrated part for an android developer. But it is important for any standard app. Especially for beginners changing icons can be a big deal. In this article, we are going to show you how you can create an app icon and how you can change the default app icon in Android Studio.
Why need a launcher icon for an app?
App icon helps the user to find your app. Anyone can find and install an app if they remember the icon of an app they previously installed. It is also important for the popularity of an app. Anyone can recognize YouTube, Facebook, Instagram app because of the icons. So, icon plays a big role in terms of branding of a platform.
Learn How To Remove The ActionBar From Specific Activities
Change the launcher logo of an app in android studio
To change the icon we need the icon first. To make an app icon you can use Photoshop, Illustrator, or any other graphic design tool. You can also use online graphic design tools like canva. The size of the icon should be square. The best practice is, export the icon in png format and the size should be 1024 px height and 1024 px width. Now follow the steps below to change the default and set your own custom-made icon.
Step 1: Go to the Image Asset
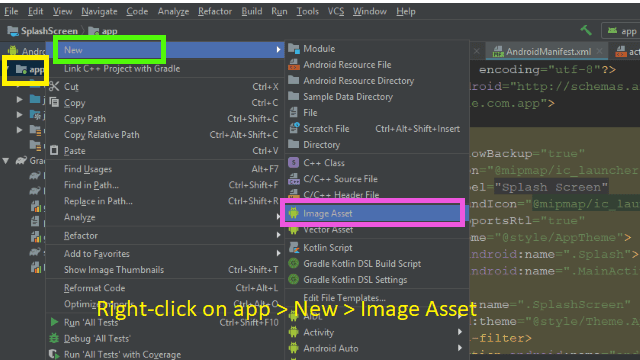
To go there, right-click on app > New > Image Asset. Here you will find a pop-up window Asset Studio. Here you can configure different image assets.
Step 2: Select the app icon
Set the icon type "Launcher Icons (Adaptive and Legacy)" and the name "ic_launcher". Now set the path where your custom-made image is stored. You can do it by clicking on the folder mark in the path section. Select your custom-made icon by browsing the file path. This thing you can find in the foreground layer section of image assets.
Step 3: Set the background layer
You should set the background because for some devices your image is not going to be suitable. You can use a background image or color. If your icon has transparent background then you can use anything. But if your icon has a background color then you should select the color. Check the color checkbox and then change the color by clicking on the color code. Use the eyedropper tool to match the background color and then click on the ok button. After finishing this click on the "Next" button.
Step 4: Check replacement files
Here you can see some files. This file list shows you where the icon is going to change. You can monitor different sizes and versions of your custom-made image. In this way, the android studio is going to take care of all file sizes and different XML color files. You don't need to change anything here. Just click on the "Finish" button.
Step 5: Run the app
After finishing all steps just run the app. This will make sure to save all the changes. Monitor the launcher image. If everything is done properly then you can see the icon on the device. If your processor doesn't support AVD then read the article about how to connect an external emulator with android studio.
Here is a video from my YouTube channel for better understanding.
Conclusion
The method we showed in this tutorial is actually the easiest and safest method. Here is another method you can try.
- First store your image in the drawable folder.
- Go to the AndroidManifest.xml file
- Replace the "android:icon" and "android:roundIcon" location with the custom icon location (you stored in the drawable folder).
- Run the app


Nice work
ReplyDelete